Sunday, January 17, 2016

Coiled bag

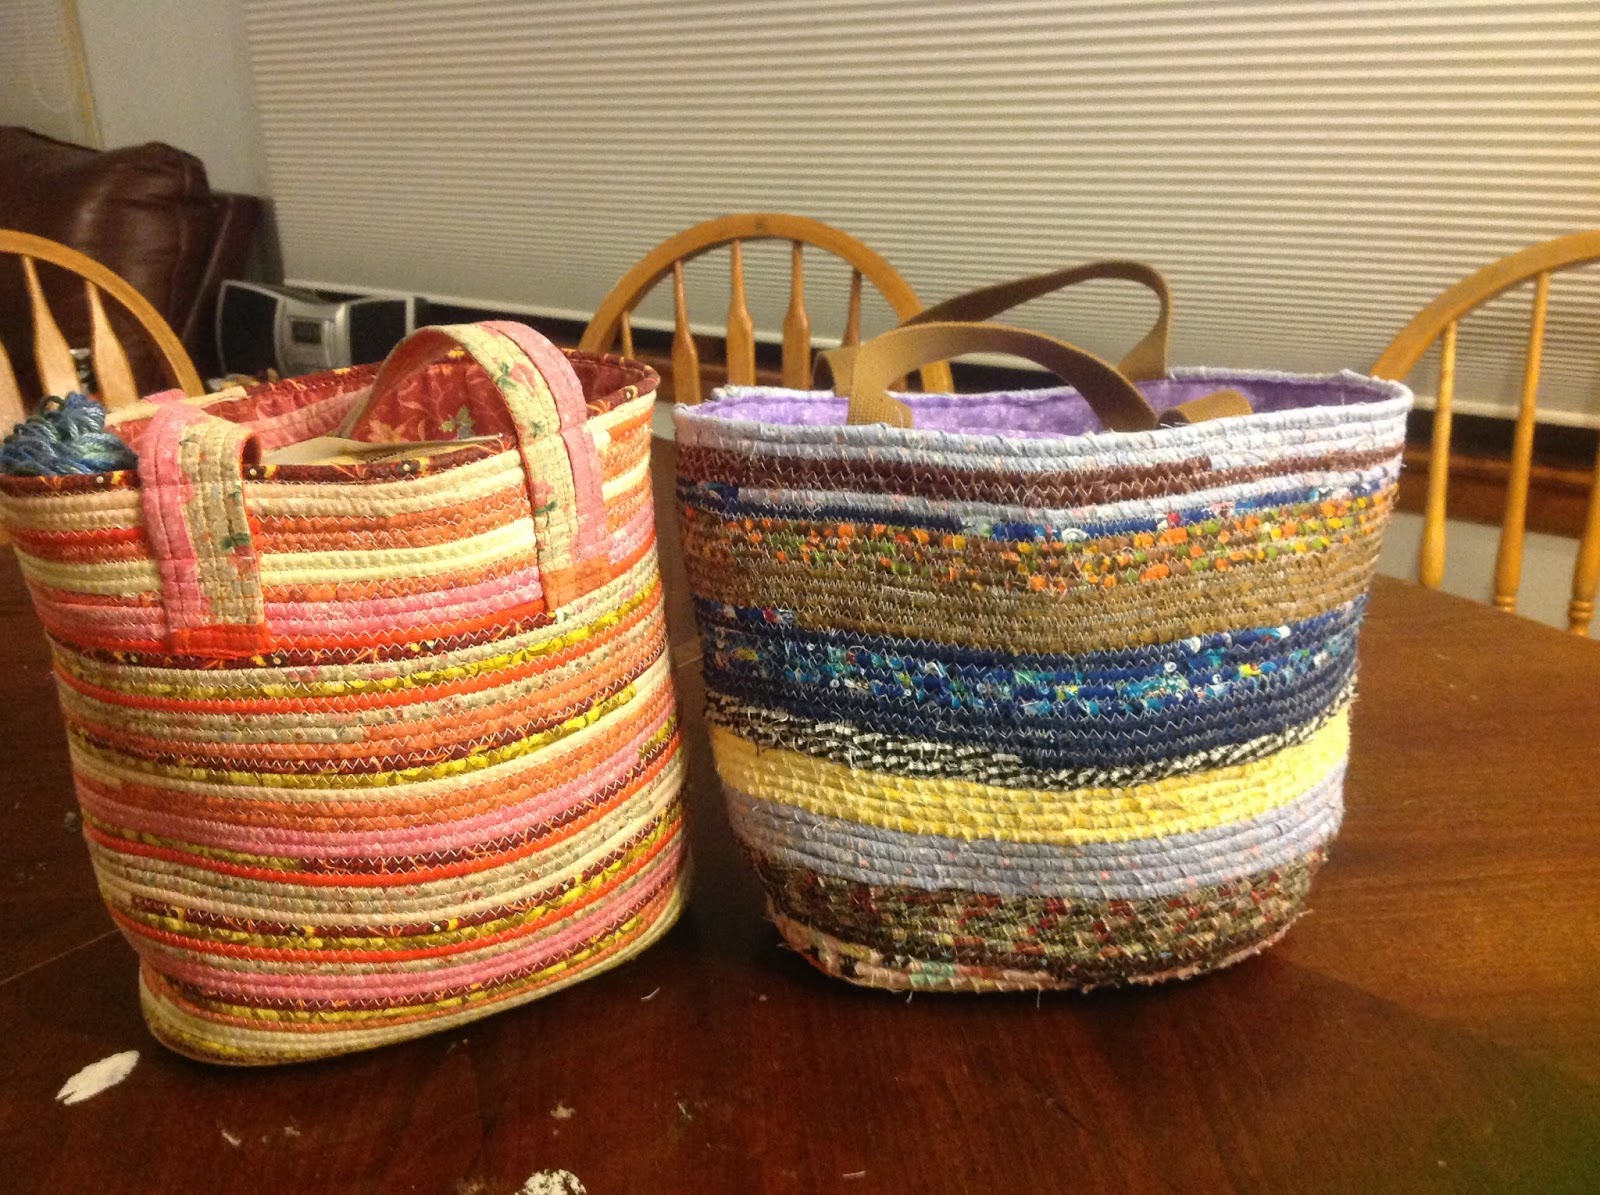
My dear friend from the elementary school made me the most beautiful coiled bag for my birthday in 2015.
I really wanted to try this.  She told me how to make it and I bought the supplies for it.  It really looked like a daunting project so it sat. And sat.  And sat.  I didn't attempt to make it until New Year's.

Here's my first attempt.


I found this to be a very challenging project.  The bag that was given to me has the fabric sewn onto the rope.  I wrapped my fabric around the rope instead.  It works equally as well, but the raw edges show and begin to fray.
Here's my second attempt.  This time I did sew the fabric onto the rope.  I asked my friend to come to my house and help me.  We chatted and sewed/knitted together.  I am pleased with this bag.  The sewing was still difficult because I folded both raw edges to the middle which left a lot of bulk to sew.  
I knew I could do better and tried my friend's way of only folding one raw edge to the middle.  This is working much better and below I will show you how a tutorial for the project.


Step 1: Gather your materials.  I bought 1 yard each of coordinating fabric.  You need not buy fabric.  Scraps from your stash will do just fine.  JoAnn's had a 50% off sale so I bought a bit more than I needed.  You will only need about 15 inches of each of the four fabrics.  Also, you need 100 feet of clothes line.  I have purchased it both at JoAnn's and Menards.  The one from JoAnn's is more flimsy and easier to work with.  The one from Menards is stiffer, which leads to a heftier bag.


Step 2: cut 1.25 inch strips of fabric.  I cut 10 of each of the four fabrics.  I have enough left over to make the lining of the bag out of any one of those fabrics.


 Here are my strips of fabric all cut out.


Step 3: Sew all fabrics end to end in a random pattern.  Here's the heap of 100 feet of 1.25 inch wide fabric.

Step 4: fold over one edge to the middle and press.

Here' the fabric all pressed and ready to go.


Step 5: Sew the fabric to the rope.  The first bit is a bit tricky.  Fold the short edge over the top of the rope, then fold in the sides.  Do your best and pin it to help you get started


Meanwhile, stop and make some Lofthouse Sugar Cookies!  YUM!!


Here's a short video on how I fold and sew as I go.


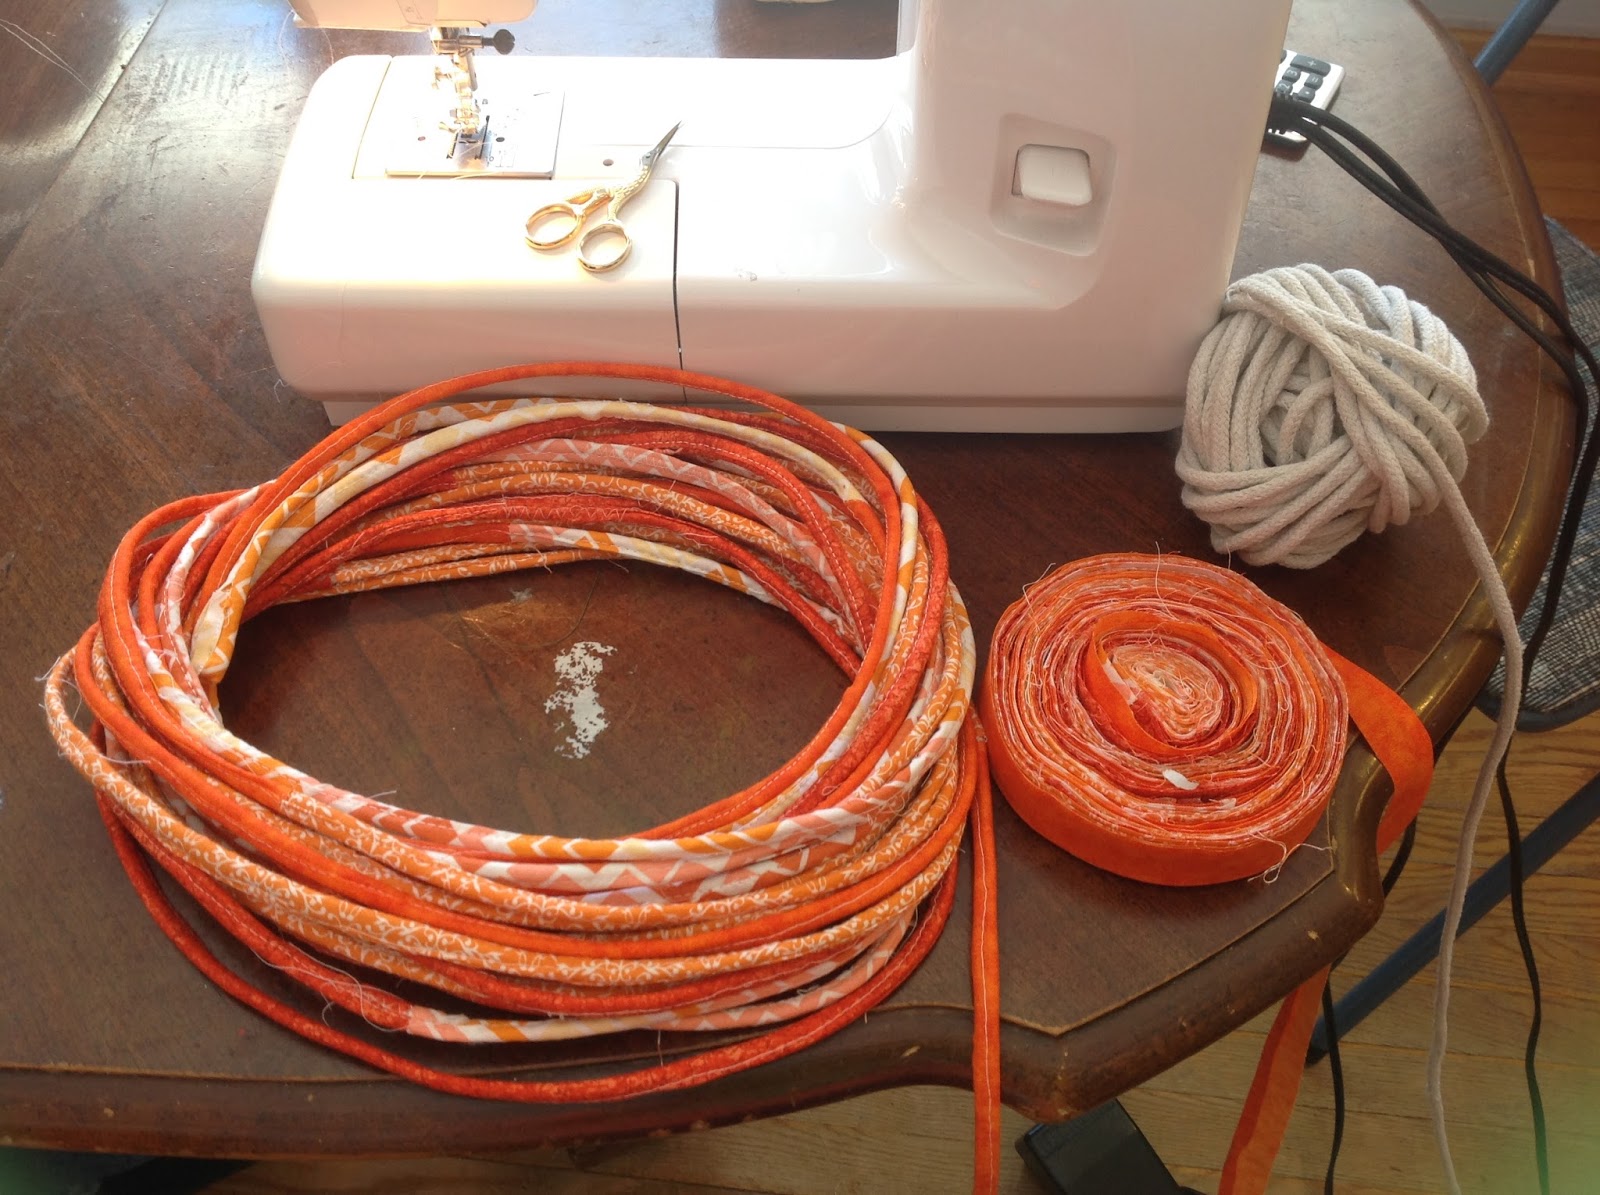
Here I sewed about 70 feet of rope.  I decided to start coiling and see if I need to sew any more fabric onto the rope.


 Step 6: Fold end in about 6 inches or to desired length.  Make sure it folds to the left.
Start sewing at the fold and work toward the tip of the rope.


This is what it looks like after a few rounds.


Continue sewing until you reach your desired width.  I wanted a bag slightly bigger so I went to 12 inches.

 Step 7: making the sides.  Here it starts to get tricky.  Lift the bag up as high as it will go and continue sewing.


 A backside view.


 Another view.


 You can see the sides taking shape.


Here's the end of my 70 feet.  Time to sew more fabric onto the rope.  UGH!
Sorry for the poor photography in the last batch of photos.  That would be my sons taking the pictures with my iPad.

Sunday, September 28, 2014

Gibson Girl


As you all know I own an antique sock knitting machine.  Next October I will be doing a presentation for the local museum and had the crazy idea of doing the presentation in period clothes.  This has been only a concept for about 2 years (or slightly more).  My machine was made in 1908 which puts me in the Edwardian Era (1900-1910).  The Gibson Girl was the personification of feminine beauty of the time.  Here is my attempt and journey at creating a Gibson Girl.  Read below and you will see all of the layers a woman of the era donned everyday.  I took a picture at every stage so you can see the progression.

 The first layer would be a chemise and drawers.  I have yet to make these garments (or even buy the pattern).  In the meantime I used a camisole and bike shorts.  Not very attractive...
Mom and Dad were visiting today.  Mom did a Gibson Girl updo for me.


I have learned the hard way that I must put on my stockings and boots BEFORE putting on a corset.  Hmmm....Can't bend very well once the corset is on.  These are silk stockings I bought.  These have elastic at the top.  In the day they didn't.  They used ribbons to hold their stockings up.  My shoes are just Danskos.  They are close enough to what was worn then and honestly no one will see my feet.


Here's the corset.  It was actually probably the first thing I purchased.  I should have ordered a smaller size.  It is cinched down as far as it can go.


I made my garments out of order.  I actually made the skirt first, then the petticoat and then the corset cover.  Here I am wearing the petticoat (slip) and corset cover.  To be true to the time I need to make another petticoat as they would frequently wear two to help the skirt hold it's shape.  The corset does not have the buttons on yet.  I didn't know how to make button holes.  When I made the corset cover I didn't have the corset on to check for size so it is a bit big.  Mom cinched it down with her hands later and it looked much better.  I don't know if I will go back and take it in.  The petticoat wasn't that bad to make.  Uncle Erik (Joel's brother) saw the progression of me making it when he had visited one weekend.  The ruffle on the other hand was a bugger!


Here's the skirt and shirtwaist.  The skirt has a black on black pattern, but it is not noticeable until one is close up.
My SIL on the Green side graciously made the shirtwaist (shirt) and gave it to me 2 years ago for Christmas.  Meanwhile, I took my time and looked for a pattern for the skirt and for the corset cover & petticoat (slip).  I finally found one and purchased it.  I was excited when the pattern arrived, but soon became disheartened when I saw how complex it was.  My sewing skills are at a beginner level. I've made some quilts, drawstring bags and other similar small items.  I put the pattern away and it sat for a very long time.  In the meantime I learned to sew aprons and enjoyed trying different patterns.
I figured I had some sewing experience under my belt so I thought I would try the skirt pattern.  I opened the skirt pattern and OMG!  There was no way I was going to be able to do this!  I had no idea how to cut the pattern out.  I waited until Amber (SIL) came for a visit and she showed me how to cut the pattern and lay it out on the material.  We did a mock up first in muslin and it turned out great!  Now it was time for me to find and order the fabric.  I did and I made the skirt, which is fully lined, in one weekend.


 Finally, here I am all decked out complete with a hat and gloves.  The hat I found at an antique store up in Eagle River, Wisconsin three summers ago.  The hat should perch on top of the hair not the head.  Here it is sitting more on my head.  Mom tried styling my hair without the hair rats in.
Grandma Virginia, my adopted grandma from my old job, had given me a hat pin to help hold the hat on.  Yesterday, Saturday, I played around with my hair and the hat.  I quickly realized one hat pin would not do.  I went to the antique store and bought four more.  At this point if I would have taken my hair down it would have been a poofy, frizzy, teased mess.  I left the hat on, shimmied into a dress (couldn't get it over my hat/head) and went to church.  A little over dressed (:

The gloves I already had.


Here's some goofy pictures of me showing off my creation!
keep scrolling down to see the apron.


 I also made a apron to wear when I actually do the demonstration.  I don't want the oil from the machine to get on my clothes.  It's quite the matronly apron.  I don't think I'd wear this in real life (I do like to wear aprons).


 After Mom finished taking photos we went inside, pulled out the sewing machine and manual and figured out how to make the button holes for the corset cover.  I did make the buttonholes and started sewing on the buttons.  Mom also played around with my hair again.  I had made some home made fake hair rats, but was having trouble with them.  Mom was able to mostly put them in my hair.  I need to make them smaller and that should work.

I figured I have put this much time, effort and money into this costume that I will wear it for halloween this year.  I might as well get as much wear out of it as I can.

Mom, thanks for all that you did with me today.  I REALLY had a fun day with you!!!

Thanks for looking!


Sunday, August 11, 2013

My last days at CWC

 As many of you know I accepted a new job.  My last day at work at CWC is Tuesday.  Here's a picture of me at my desk taken with my ipod.


 To show you how important my dork sisters are to me I took this picture of the BB behind my desk filled with my favorite cards received from my dork sisters.

This is the inside of my door.  I keep my door open so the big bear helps people see from WAY down the hall if I am in or not.  Otherwise, the door blends into the wall behind it and one  can not tell if my door is open or not.  The snowman was made by DS#2, the folded paper above it is something DS#3 wrote/drew and the "40's" are a poster co-workers made to decorate my room on my birthday this year.

Sunday, June 23, 2013

Basket and Garden


I made this basket for my knitting.  I love it!

                                                               The garden 2013.

                                                I just mounded the potatoes today!


                                                                 My herb garden

                                                       Son #3's zucchini garden

Wednesday, May 29, 2013

Newborn sweater

 
Here's a picture of the sweater I made for a co-worker's newborn baby.  The baby weighed over 8 pounds at birth so the sweater will not fit much longer!

Saturday, March 16, 2013

My 40th Birthday!

Lordy, Lordy look who is 40!!
 Here we are the Sunday before my birthday at TGIF, my favorite spot!


 Awww, what a cute kid!

I had an awesome few days this week.
First, on Wednesday, I received a bouquet of flowers from my Womb Buddy.  I was so touched!  It really made my day.
Then on Thursday I had a lunch date with the medical director.  When we got to the restaurant there were 10 of my co-workers there for a surprise party!  How did they ever know?  Was it the fact that I kept saying almost every day, "I hope someone plans a surprise party for me"?  Hmmm...
I was really honored to have so many people come and celebrate with me.  My boss went to a bakery and had little cheesecake cupcakes made for me that she passed out after lunch.  What a treat!
When I got home that day I had a card from my grandmother.  In the card she included a photo of her from when she was eight and a portrait of her mother and father.  Could things get any better??
I was flying high.  My girlfriend from HS, Emily, sent me a musical card of Indiana Jones that cracked me up.  She and I would go and see the Indy movies together.


Friday, the day of my birthday I went to work for a few hours to give my co-workers a chance to wish me a happy birthday!  
Two CNAs from one of the buildings tip-toed up to my office door shortly after I arrived.  I heard them whispering, "She can't be here already!" They couldn't believe I was in already for the day.  I was  shoo-ed out off my office so they could decorate it.  They put up 4 birthday posters in my office and took a cookie.
As I went to building 5 to pick up an individual there was another poster on the outside of the door of the stairwell....with a tiara attached!
When I walked in she was standing there next to my guy wishing me a happy birthday.
I was whisked into the bathroom to put on the tiara while unknown to me one the CNA's went to the next apartment holding a balloon and some muffins for the resident and me to eat!
Aaron, one of the housekeepers talks to me frequently about the yummy food he makes, specifically, his fried chicken.  Throughout the week I kept saying, "mmmm! I'd love to have some of that fried chicken!"  Thursday he asked, "wing or thigh?" I responded, "breast".
Sure enough, Friday morning, I got a hot piece (breast) of fried chicken for my birthday!
He probably starts work around 4-5 am and he told me he made the fried chicken that morning.  Wow!
I tell you it was the best fried chicken I think I ever had!

I passed out almost 15 dozen cookies in the morning and received many birthday wishes along the way.  It was a great way to spend the morning!
Then Joel and I spent the rest of the day together.  We started off by going to the Sow's Ear in Verona for coffee/soda and to play Scrabble.  We had a grand time except for the really loud annoying women who didn't know how not to shout their conversation.
After about 2 hours we left and went to Joann Fabrics so I could get some thread and flannel.
Then we stopped at Half-priced books before going to The Prime Quarter.
The above photo is of Joel grilling our steaks.

And here we are together at our table.  Awww, aren't we cute?


Here I am with my cake with 40 candles. EGADS!


My Womb Buddy sent me flowers!


A friend on Ravelry sent me some flannel to make this baby blanket!


Here's a close up (below)


Here's another I made with some fabric I bought at Joann's.  I am contemplating putting it up for sale on Etsy.